Overview
The Flash Firmware page allows you to install firmware to your Duck devices directly from your web browser using USB. No external software or command-line tools required - everything is done through the OWL DMS interface.Prerequisites
Chrome Browser
Chrome or Edge (version 89+) required
USB Cable
USB connection to your computer
Device Registered
Device must exist in Network page
Serial Permissions
Grant browser serial port access
4-Step Flashing Process
The firmware flashing wizard guides you through four simple steps:Step 1: Connect Device
1
Connect via USB
Plug your Duck device into your computer using a USB cable.
2
Click Connect Device
The interface will detect available serial ports.
3
Grant Browser Permission
When prompted, select your device’s serial port and click “Connect”.
4
Wait for Connection
The system will establish a connection with your device.
If you don’t see your device in the serial port list, check your USB connection and ensure drivers are installed.
Step 2: Select Device Type
Choose which type of Duck device you’re flashing:- Gateway (PapaDuck)
- Node (MamaDuck)
- DetectorDuck
Network Hub
- Connects to WiFi
- Sends data to cloud
- Manages MamaDucks
- Always powered on
Step 3: Configure Firmware
Configuration options vary by device type.View All Firmware Types
See detailed information about each firmware type, including sensor wiring diagrams and GPIO pin configurations
MamaDuck Configuration
MamaDuck Configuration
1. Select Your MamaDuck
- Choose from existing MamaDucks in your account
- Devices are grouped by their assigned PapaDuck
- Select ClusterDuck Protocol (CDP) version
- Latest stable version recommended
- Set how often GPS coordinates are sent
- Options: 5, 10, 15, 30, or 60 minutes
- Lower intervals = more frequent updates, higher battery usage
- Enable external LED indicator
- Configure GPIO pin (default: 4)
- Sends GPS coordinates periodically
- Use for: Asset tracking, mobile monitoring
- Temperature and pressure monitoring
- Configure sensor interval (30 sec to 60 min)
- Configure sensor GPIO pin
- Use for: Weather monitoring
- Advanced temperature and pressure
- Higher precision than BMP180
- Configure sensor interval and GPIO pin
- Use for: Precision environmental monitoring
- Temperature and humidity monitoring
- Configure sensor interval and GPIO pin
- Use for: Climate monitoring
- Rainbow LED pattern display
- Configure number of LEDs
- Use for: Visual indicators, testing
PapaDuck Configuration
PapaDuck Configuration
1. Select Your PapaDuck
- Choose from existing PapaDucks in your account
- WiFi - Standard gateway, connects via WiFi only
- WiFi + LTE - Dual connectivity with cellular fallback (requires LilyGo T-SIM7000G with LoRa Hat)
- Select CDP version
- SSID: Your WiFi network name
- Password: Your WiFi password
- Device will use this to connect and upload data
- Enable external LED indicator
- Configure GPIO pin
For WiFi + LTE firmware, ensure you have an activated IoT SIM card installed in your LilyGo T-SIM7000G board before flashing.
DetectorDuck Configuration
DetectorDuck Configuration
External LED Configuration
- Configure LED settings for visual feedback
- See deployment documentation for usage guide
Step 4: Review & Flash
Review Your Configuration Before flashing, you’ll see a summary of all your selections:- Device type
- Selected device
- Firmware version
- WiFi settings (for PapaDuck)
- Sensor type and intervals (for MamaDuck)
- LED configuration
- Prepare - Validate configuration
-
Build Firmware (~20 seconds)
- Compiles custom firmware with your settings
- Progress bar shows build status
- Erase Flash - Clears existing firmware
-
Write Firmware - Uploads new firmware
- File-by-file progress shown
- Multiple files uploaded sequentially
- Verify - Confirms successful installation
- Real-time flash progress
- Device boot messages
- Error messages (if any)
- Firmware version confirmation
- Reconnect if connection is lost
- Change baud rate (default: 115200)
- Send commands to the device
- Clear terminal output
After Flashing
LED Status Indicators
LED colors indicate the current status of your device. MamaDuck and PapaDuck use different indicators: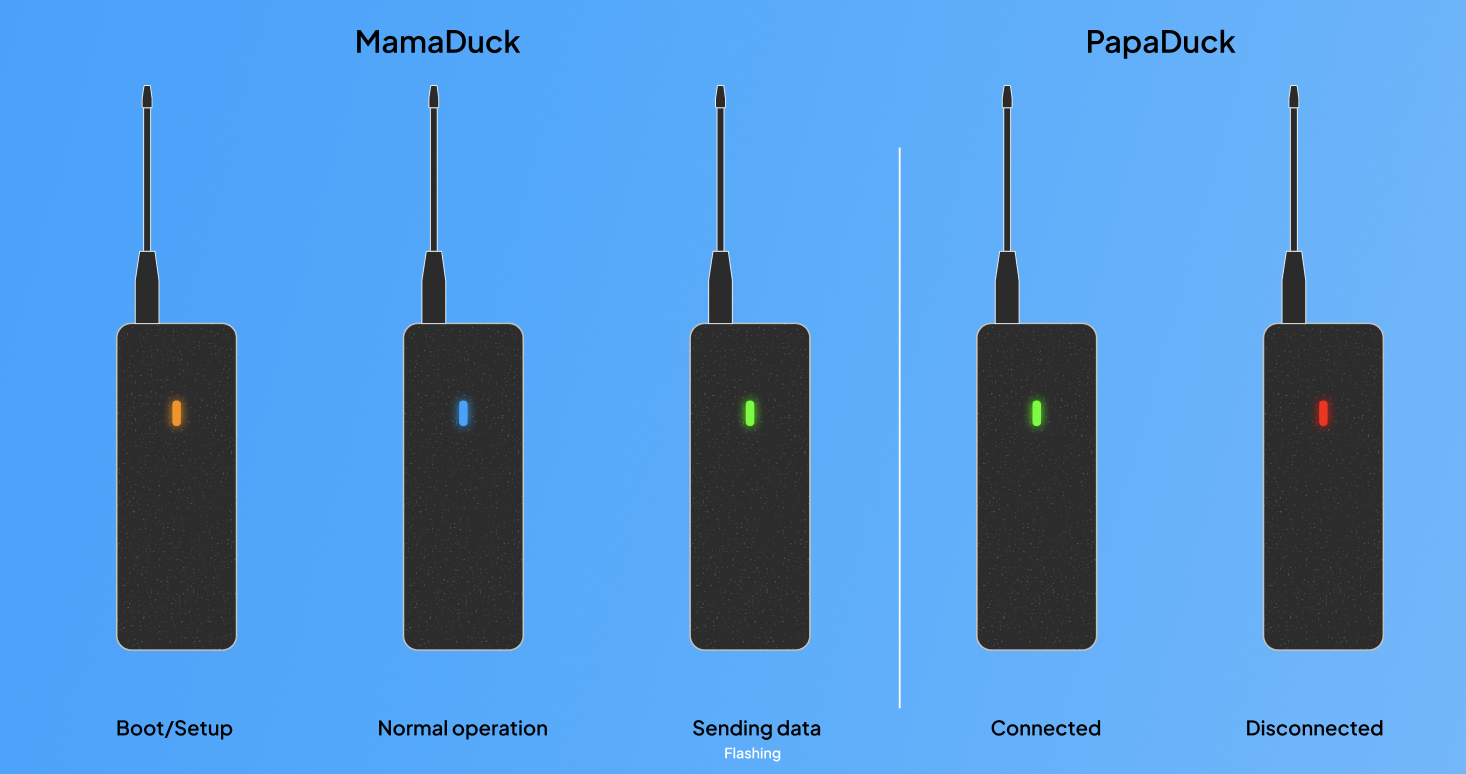
PapaDuck
The LED indicator helps you quickly identify your device’s status without needing to check the serial monitor or dashboard.
Next Steps
Network Management
View your device in the Network page
Dashboard
Monitor device messages
Map View
See device location (if GPS enabled)
Troubleshooting
Serial port not found
Serial port not found
Solutions:
- Check USB cable is properly connected
- Try a different USB port
- Install CP210x USB drivers (if needed)
- Restart your browser
- Ensure no other program is using the serial port
Flash process fails
Flash process fails
Common Causes:
- Device disconnected during flash
- Insufficient power via USB
- Corrupted USB cable
- Wrong device type selected
- Use a high-quality USB cable
- Try connecting directly to computer (not via hub)
- Ensure correct device type is selected
- Retry the flash process
Device won't boot after flashing
Device won't boot after flashing
Solutions:
- Check serial monitor for error messages
- Verify WiFi credentials (for PapaDuck)
- Try reflashing with default settings
- Check sensor GPIO pin assignments
- Power cycle the device
PapaDuck won't connect to WiFi
PapaDuck won't connect to WiFi
Check:
- SSID is correct (case-sensitive)
- Password is correct
- WiFi network is 2.4GHz (5GHz not supported)
- Device is within WiFi range
- Serial monitor shows connection attempts
MamaDuck not sending data
MamaDuck not sending data
Check:
- Device is assigned to correct PapaDuck
- PapaDuck is online
- Sensor is connected to correct GPIO pin
- Sensor interval is reasonable
- Battery is charged
PapaDuck LTE not connecting
PapaDuck LTE not connecting
Check:
- SIM card is properly inserted in the LilyGo T-SIM7000G
- SIM card is activated with your IoT provider
- LTE antenna is connected
- Device has cellular coverage in your area
- Serial monitor shows modem initialization
- “No response from modem”: Check that SIM card is seated correctly
- “Network registration timeout”: SIM may not be activated, or no coverage
- “MQTT connection failed”: Check that certificates are properly configured
Browser doesn't support Web Serial
Browser doesn't support Web Serial
Requirements:
- Google Chrome 89+ or Microsoft Edge 89+
- Web Serial API enabled (enabled by default)
- Not supported: Firefox, Safari
Configuration Tips
Battery Life
Extend Battery:
- Increase GPS interval (30-60 min)
- Increase sensor interval
- Disable external LED when not needed
Data Frequency
More Frequent Data:
- Decrease GPS interval (5-10 min)
- Decrease sensor interval
- Note: Higher battery drain
WiFi Stability
Better Connectivity:
- Place PapaDuck near WiFi router
- Use 2.4GHz network (better range)
- Avoid WiFi with captive portals
Sensor Selection
Choose Right Sensor:
- GPS: Location tracking
- BMP180/390: Weather monitoring
- DHT11: Indoor climate
- LED: Visual testing
Firmware Versions
ClusterDuck Protocol (CDP) The firmware is based on the ClusterDuck Protocol, our open-source LoRa mesh network library. The CDP is made by OWL and maintained by OWL.- Stable Versions: Recommended for production use
- Beta Versions: Latest features, may have bugs
- Version Numbers: e.g., “v4.0 (Stable)”
Related Pages
Firmware Types
Detailed firmware options and sensor wiring
Device Types
Learn about Papa/Mama/Detector differences