> ## Documentation Index
> Fetch the complete documentation index at: https://docs.owlintegrations.com/llms.txt
> Use this file to discover all available pages before exploring further.
# Flash Firmware
> Install firmware to your Duck devices via USB
## Overview
The Flash Firmware page allows you to install firmware to your Duck devices directly from your web browser using USB. No external software or command-line tools required - everything is done through the OWL DMS interface.
**Browser Requirement**: This feature requires Google Chrome or Microsoft Edge browser with Web Serial API support.
## Prerequisites
Chrome or Edge (version 89+) required
USB connection to your computer
Device must exist in Network page
Grant browser serial port access
***
## 4-Step Flashing Process
The firmware flashing wizard guides you through four simple steps:
### Step 1: Connect Device
Plug your Duck device into your computer using a USB cable.
The interface will detect available serial ports.
When prompted, select your device's serial port and click "Connect".
The system will establish a connection with your device.
If you don't see your device in the serial port list, check your USB connection and ensure drivers are installed.
***
### Step 2: Select Device Type
Choose which type of Duck device you're flashing:
**Network Hub**
* Connects to WiFi
* Sends data to cloud
* Manages MamaDucks
* Always powered on
**Best For**: Central hub locations with WiFi and power access
**Sensor & Relay Device**
* Collects sensor data
* Battery powered
* Mobile deployment
* Multiple sensor options
**Best For**: Field data collection and mobile sensing
**Network Testing Tool**
* Signal strength measurement
* Deployment optimization
* Range testing
* LED feedback
**Best For**: Planning deployments and troubleshooting
***
### Step 3: Configure Firmware
Configuration options vary by device type.
See detailed information about each firmware type, including sensor wiring diagrams and GPIO pin configurations
**1. Select Your MamaDuck**
* Choose from existing MamaDucks in your account
* Devices are grouped by their assigned PapaDuck
**2. Firmware Version**
* Select ClusterDuck Protocol (CDP) version
* Latest stable version recommended
**3. GPS Interval** (Optional)
* Set how often GPS coordinates are sent
* Options: 5, 10, 15, 30, or 60 minutes
* Lower intervals = more frequent updates, higher battery usage
**4. External LED** (Optional)
* Enable external LED indicator
* Configure GPIO pin (default: 4)
**5. Firmware Type** - Choose ONE:
**GPS Location**
* Sends GPS coordinates periodically
* Use for: Asset tracking, mobile monitoring
**BMP180 Sensor**
* Temperature and pressure monitoring
* Configure sensor interval (30 sec to 60 min)
* Configure sensor GPIO pin
* Use for: Weather monitoring
**BMP390 Sensor**
* Advanced temperature and pressure
* Higher precision than BMP180
* Configure sensor interval and GPIO pin
* Use for: Precision environmental monitoring
**DHT11 Sensor**
* Temperature and humidity monitoring
* Configure sensor interval and GPIO pin
* Use for: Climate monitoring
**LED Control**
* Rainbow LED pattern display
* Configure number of LEDs
* Use for: Visual indicators, testing
**1. Select Your PapaDuck**
* Choose from existing PapaDucks in your account
**2. Firmware Variant**
* **WiFi** - Standard gateway, connects via WiFi only
* **WiFi + LTE** - Dual connectivity with cellular fallback (requires LilyGo T-SIM7000G with LoRa Hat)
**3. Firmware Version**
* Select CDP version
**4. WiFi Credentials** (Required)
* **SSID**: Your WiFi network name
* **Password**: Your WiFi password
* Device will use this to connect and upload data
**5. External LED** (Optional)
* Enable external LED indicator
* Configure GPIO pin
For WiFi + LTE firmware, ensure you have an activated IoT SIM card installed in your LilyGo T-SIM7000G board before flashing.
**External LED Configuration**
* Configure LED settings for visual feedback
* See [deployment documentation](https://docs.owlintegrations.com) for usage guide
***
### Step 4: Review & Flash
**Review Your Configuration**
Before flashing, you'll see a summary of all your selections:
* Device type
* Selected device
* Firmware version
* WiFi settings (for PapaDuck)
* Sensor type and intervals (for MamaDuck)
* LED configuration
**Flash Progress**
Once you click "Flash Device", the system will:
1. **Prepare** - Validate configuration
2. **Build Firmware** (\~20 seconds)
* Compiles custom firmware with your settings
* Progress bar shows build status
3. **Erase Flash** - Clears existing firmware
4. **Write Firmware** - Uploads new firmware
* File-by-file progress shown
* Multiple files uploaded sequentially
5. **Verify** - Confirms successful installation
**Do not disconnect the device during flashing!** The process takes 1-3 minutes. Disconnecting may corrupt the firmware.
**Serial Monitor**
The Review step includes a serial terminal that shows:
* Real-time flash progress
* Device boot messages
* Error messages (if any)
* Firmware version confirmation
You can:
* **Reconnect** if connection is lost
* **Change baud rate** (default: 115200)
* **Send commands** to the device
* **Clear terminal** output
***
## After Flashing
### LED Status Indicators
LED colors indicate the current status of your device. MamaDuck and PapaDuck use different indicators:
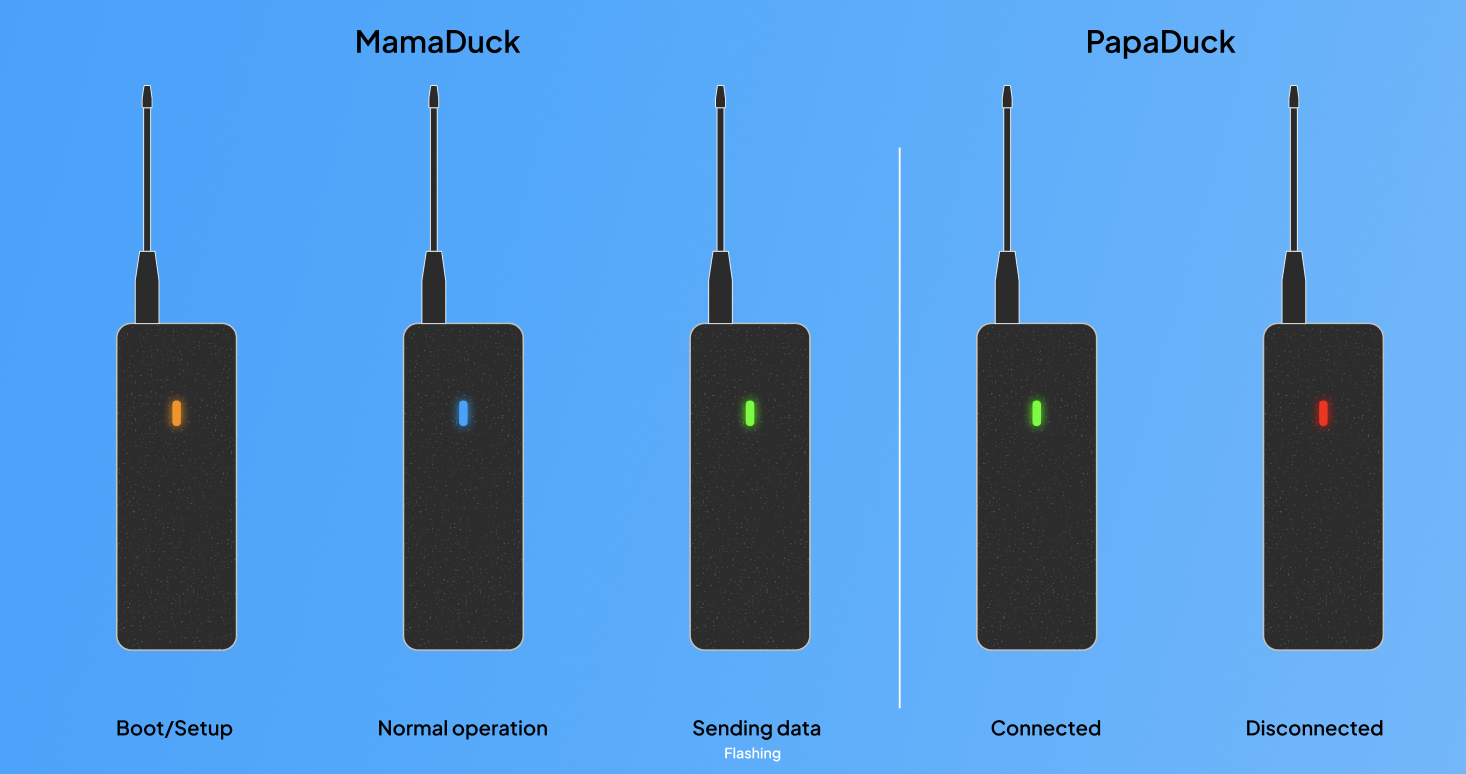 **MamaDuck**
| LED Color | Status | Description |
| -------------------- | ---------------- | ------------------------------------------------ |
| **Orange** | Boot/Setup | Device is starting up and initializing |
| **Blue** | Normal Operation | Device is running and operating normally |
| **Green** (flashing) | Sending Data | Device is actively transmitting data to the mesh |
**PapaDuck**
| LED Color | Status | Description |
| --------- | ------------ | ----------------------------------------------- |
| **Green** | Connected | WiFi connected and communicating with the cloud |
| **Red** | Disconnected | No WiFi connection or network issue |
The LED indicator helps you quickly identify your device's status without needing to check the serial monitor or dashboard.
### Next Steps
View your device in the Network page
Monitor device messages
See device location (if GPS enabled)
***
## Troubleshooting
**Solutions**:
* Check USB cable is properly connected
* Try a different USB port
* Install CP210x USB drivers (if needed)
* Restart your browser
* Ensure no other program is using the serial port
**Common Causes**:
* Device disconnected during flash
* Insufficient power via USB
* Corrupted USB cable
* Wrong device type selected
**Solutions**:
* Use a high-quality USB cable
* Try connecting directly to computer (not via hub)
* Ensure correct device type is selected
* Retry the flash process
**Solutions**:
* Check serial monitor for error messages
* Verify WiFi credentials (for PapaDuck)
* Try reflashing with default settings
* Check sensor GPIO pin assignments
* Power cycle the device
**Check**:
* SSID is correct (case-sensitive)
* Password is correct
* WiFi network is 2.4GHz (5GHz not supported)
* Device is within WiFi range
* Serial monitor shows connection attempts
**Solution**: Reflash with correct credentials
**Check**:
* Device is assigned to correct PapaDuck
* PapaDuck is online
* Sensor is connected to correct GPIO pin
* Sensor interval is reasonable
* Battery is charged
**View**: Check Dashboard for messages
**Check**:
* SIM card is properly inserted in the LilyGo T-SIM7000G
* SIM card is activated with your IoT provider
* LTE antenna is connected
* Device has cellular coverage in your area
* Serial monitor shows modem initialization
**Common Issues**:
* **"No response from modem"**: Check that SIM card is seated correctly
* **"Network registration timeout"**: SIM may not be activated, or no coverage
* **"MQTT connection failed"**: Check that certificates are properly configured
**Solution**: Verify SIM activation with your provider, try a different location with better signal
**Requirements**:
* Google Chrome 89+ or Microsoft Edge 89+
* Web Serial API enabled (enabled by default)
* Not supported: Firefox, Safari
**Solution**: Use Chrome or Edge browser
***
## Configuration Tips
**Extend Battery**:
* Increase GPS interval (30-60 min)
* Increase sensor interval
* Disable external LED when not needed
**More Frequent Data**:
* Decrease GPS interval (5-10 min)
* Decrease sensor interval
* Note: Higher battery drain
**Better Connectivity**:
* Place PapaDuck near WiFi router
* Use 2.4GHz network (better range)
* Avoid WiFi with captive portals
**Choose Right Sensor**:
* GPS: Location tracking
* BMP180/390: Weather monitoring
* DHT11: Indoor climate
* LED: Visual testing
***
## Firmware Versions
**ClusterDuck Protocol (CDP)**
The firmware is based on the [ClusterDuck Protocol](https://clusterduckprotocol.org/), our open-source LoRa mesh network library. The CDP is made by OWL and maintained by OWL.
* **Stable Versions**: Recommended for production use
* **Beta Versions**: Latest features, may have bugs
* **Version Numbers**: e.g., "v4.0 (Stable)"
Always use the latest stable version unless you need specific beta features.
***
## Related Pages
Detailed firmware options and sensor wiring
Learn about Papa/Mama/Detector differences
**MamaDuck**
| LED Color | Status | Description |
| -------------------- | ---------------- | ------------------------------------------------ |
| **Orange** | Boot/Setup | Device is starting up and initializing |
| **Blue** | Normal Operation | Device is running and operating normally |
| **Green** (flashing) | Sending Data | Device is actively transmitting data to the mesh |
**PapaDuck**
| LED Color | Status | Description |
| --------- | ------------ | ----------------------------------------------- |
| **Green** | Connected | WiFi connected and communicating with the cloud |
| **Red** | Disconnected | No WiFi connection or network issue |
The LED indicator helps you quickly identify your device's status without needing to check the serial monitor or dashboard.
### Next Steps
View your device in the Network page
Monitor device messages
See device location (if GPS enabled)
***
## Troubleshooting
**Solutions**:
* Check USB cable is properly connected
* Try a different USB port
* Install CP210x USB drivers (if needed)
* Restart your browser
* Ensure no other program is using the serial port
**Common Causes**:
* Device disconnected during flash
* Insufficient power via USB
* Corrupted USB cable
* Wrong device type selected
**Solutions**:
* Use a high-quality USB cable
* Try connecting directly to computer (not via hub)
* Ensure correct device type is selected
* Retry the flash process
**Solutions**:
* Check serial monitor for error messages
* Verify WiFi credentials (for PapaDuck)
* Try reflashing with default settings
* Check sensor GPIO pin assignments
* Power cycle the device
**Check**:
* SSID is correct (case-sensitive)
* Password is correct
* WiFi network is 2.4GHz (5GHz not supported)
* Device is within WiFi range
* Serial monitor shows connection attempts
**Solution**: Reflash with correct credentials
**Check**:
* Device is assigned to correct PapaDuck
* PapaDuck is online
* Sensor is connected to correct GPIO pin
* Sensor interval is reasonable
* Battery is charged
**View**: Check Dashboard for messages
**Check**:
* SIM card is properly inserted in the LilyGo T-SIM7000G
* SIM card is activated with your IoT provider
* LTE antenna is connected
* Device has cellular coverage in your area
* Serial monitor shows modem initialization
**Common Issues**:
* **"No response from modem"**: Check that SIM card is seated correctly
* **"Network registration timeout"**: SIM may not be activated, or no coverage
* **"MQTT connection failed"**: Check that certificates are properly configured
**Solution**: Verify SIM activation with your provider, try a different location with better signal
**Requirements**:
* Google Chrome 89+ or Microsoft Edge 89+
* Web Serial API enabled (enabled by default)
* Not supported: Firefox, Safari
**Solution**: Use Chrome or Edge browser
***
## Configuration Tips
**Extend Battery**:
* Increase GPS interval (30-60 min)
* Increase sensor interval
* Disable external LED when not needed
**More Frequent Data**:
* Decrease GPS interval (5-10 min)
* Decrease sensor interval
* Note: Higher battery drain
**Better Connectivity**:
* Place PapaDuck near WiFi router
* Use 2.4GHz network (better range)
* Avoid WiFi with captive portals
**Choose Right Sensor**:
* GPS: Location tracking
* BMP180/390: Weather monitoring
* DHT11: Indoor climate
* LED: Visual testing
***
## Firmware Versions
**ClusterDuck Protocol (CDP)**
The firmware is based on the [ClusterDuck Protocol](https://clusterduckprotocol.org/), our open-source LoRa mesh network library. The CDP is made by OWL and maintained by OWL.
* **Stable Versions**: Recommended for production use
* **Beta Versions**: Latest features, may have bugs
* **Version Numbers**: e.g., "v4.0 (Stable)"
Always use the latest stable version unless you need specific beta features.
***
## Related Pages
Detailed firmware options and sensor wiring
Learn about Papa/Mama/Detector differences