> ## Documentation Index
> Fetch the complete documentation index at: https://docs.owlintegrations.com/llms.txt
> Use this file to discover all available pages before exploring further.
# Firmware Types
> Understanding different Duck firmware options and sensor configurations
## Overview
OWL DMS supports multiple firmware types for Duck devices, each designed for specific use cases. This guide covers firmware options for both PapaDuck (gateway) and MamaDuck (sensor node) devices.
***
## PapaDuck Firmware Variants
PapaDuck devices serve as the gateway between your mesh network and the cloud. Choose the variant that matches your connectivity requirements.
**Description:**
The standard PapaDuck firmware connects to your WiFi network to relay mesh network data to the cloud. This is the recommended option when you have reliable WiFi coverage at your gateway location.
**Features:**
* Connects to 2.4GHz WiFi networks
* Secure TLS connection to AWS IoT Core
* Receives and forwards all mesh network messages
* Queues messages when temporarily disconnected
* LED status indicator for connection state
**Requirements:**
| Component | Details |
| ------------ | ---------------------------------------- |
| Hardware | Any supported PapaDuck device |
| WiFi Network | 2.4GHz network (5GHz not supported) |
| Power | Continuous USB or wall power recommended |
**LED Status Indicators:**
| LED Color | Status |
| --------- | ---------------------------------------- |
| Green | WiFi connected, communicating with cloud |
| Red | No WiFi connection |
| Blue | Transmitting data |
**Use Cases:**
* Indoor gateway installations
* Locations with reliable WiFi coverage
* Office or building deployments
* Home mesh network setups
**Description:**
This advanced PapaDuck variant provides dual connectivity using both WiFi and LTE cellular. WiFi is the primary connection, but if WiFi becomes unavailable, the device automatically falls back to LTE to ensure your mesh network data always reaches the cloud.
**Features:**
* Primary WiFi connection with automatic LTE fallback
* Seamless switching between WiFi and cellular
* Periodic WiFi reconnection attempts (every 10 minutes when on LTE)
* Secure TLS connection over both WiFi and cellular
* Message queuing during connection transitions
* LED status indicator for connection state
**Special Hardware Required**: This firmware requires specific hardware - see requirements below.
**Hardware Requirements:**
| Component | Details |
| --------- | --------------------------------------------- |
| Board | LilyGo T-SIM7000G with LoRa Hat |
| SIM Card | Activated IoT SIM card (Hologram recommended) |
| Antenna | LTE antenna (included with board) |
| Power | USB or battery power |
The LilyGo T-SIM7000G board combines the SIM7000G cellular modem with an ESP32. You need the version with the LoRa hat attachment to enable mesh network communication.
**What You Need to Provide:**
1. **LilyGo T-SIM7000G board with LoRa Hat** - Available from LilyGo or electronics retailers
2. **Hologram SIM card** - The firmware is configured for Hologram SIM cards. You must activate the SIM and add a data plan on the Hologram dashboard at [hologram.io](https://hologram.io) before use. Other IoT SIM providers may work but are not officially supported.
3. **WiFi credentials** - Your 2.4GHz network SSID and password
4. **LTE antenna** - Usually included with the board
**Hologram SIM setup required before flashing:** Create an account at [hologram.io](https://hologram.io), activate your SIM, and add a data plan. The device will not connect over LTE until the SIM has an active plan.
**Connection Priority:**
| Priority | Connection | When Used |
| -------- | ---------- | ---------------------------------------- |
| 1 | WiFi | Always preferred when available |
| 2 | LTE | Automatic fallback when WiFi unavailable |
**LED Status Indicators:**
| LED Color | Status |
| --------- | ------------------------------------ |
| Green | Connected (WiFi or LTE) |
| Red | No connection (neither WiFi nor LTE) |
| Blue | Transmitting data |
**Connection Behavior:**
* On startup, attempts WiFi connection first
* If WiFi fails after 3 retries, initializes LTE modem
* When on LTE, periodically checks for WiFi availability (every 10 minutes)
* Automatically switches back to WiFi when it becomes available
* Messages are queued if both connections temporarily fail
**Use Cases:**
* Remote or outdoor gateway installations
* Locations with unreliable WiFi
* Mobile gateway deployments
* Disaster response and emergency networks
* Agricultural or rural deployments
* Backup connectivity for critical networks
***
## MamaDuck Firmware Types
MamaDuck devices collect sensor data and relay messages through the mesh network. Some firmware types require physical sensors to be connected to GPIO pins.
**Description:**\
Sends GPS coordinates periodically through the mesh network, perfect for asset tracking and mobile monitoring applications.
**Features:**
* Built-in GPS functionality (no external sensors needed)
* Periodic location updates
* Configurable update intervals to optimize battery life
* Latitude, longitude, and altitude tracking
**Configuration Options:**
| Setting | Options | Recommendation |
| ---------------- | ---------------------------- | --------------------------------------- |
| GPS Interval | 5, 10, 15, 30, or 60 minutes | 15-30 min for balanced battery/accuracy |
| Update Frequency | Low to High | Higher frequency = more battery drain |
**Hardware Requirements:**
* **No external sensors required**
* GPS module included in standard MamaDuck hardware
**Description:**\
Monitors temperature and atmospheric pressure. The BMP180, BMP280, and BMP390 are all covered under this single firmware type — you select your specific sensor model during configuration.
**Features:**
* Temperature measurement (-40°C to +85°C)
* Barometric pressure monitoring
* Low power consumption
* I2C communication protocol
**Sensor Model Comparison:**
| Feature | BMP180 | BMP280 | BMP390 |
| -------------------- | ------------ | ------------ | ------------ |
| Pressure Range | 300–1100 hPa | 300–1100 hPa | 300–1250 hPa |
| Pressure Accuracy | ±1 hPa | ±1 hPa | ±0.5 hPa |
| Temperature Accuracy | ±1°C | ±1°C | ±0.5°C |
| Power Consumption | Standard | Lower | Lowest |
**Configuration Options:**
| Setting | Options | Notes |
| --------------- | ------------------------------- | ------------------------------------------------------------------------ |
| Sensor Model | BMP180, BMP280, BMP390 | Choose your sensor model from the dropdown after selecting this firmware |
| Sensor Interval | 30 sec to 60 min | How often sensor readings are taken |
| I2C SDA Pin | Configurable (default: GPIO 21) | GPIO pin for I2C data line |
| I2C SCL Pin | Configurable (default: GPIO 22) | GPIO pin for I2C clock line |
**Hardware Required**: You must physically connect a BMP sensor to your MamaDuck device before using this firmware.
**Hardware Connection:**
All BMP variants use I2C and share the same wiring.
**Required Components:**
* BMP180, BMP280, or BMP390 sensor module
* 4 jumper wires
**Wiring Diagram:**
| BMP Pin | MamaDuck Pin | Description |
| ------- | ----------------- | ------------ |
| VCC | 3.3V | Power supply |
| GND | GND | Ground |
| SDA | GPIO 21 (default) | I2C Data |
| SCL | GPIO 22 (default) | I2C Clock |
Most BMP modules operate at 3.3V. Double-check your module's voltage requirements before connecting.
**Description:**\
Monitors temperature and relative humidity using the DHT11 sensor. Perfect for indoor climate monitoring and agricultural applications.
**Features:**
* Temperature measurement (0-50°C)
* Relative humidity (20-90%)
* Cost-effective solution
* Simple single-wire digital interface
**Configuration Options:**
| Setting | Options | Notes |
| --------------- | ---------------- | --------------------------- |
| Sensor Interval | 30 sec to 60 min | Reading frequency |
| GPIO Pin | Configurable | Digital pin for sensor data |
**Hardware Required**: You must physically connect a DHT11 sensor to your MamaDuck device before using this firmware.
**Hardware Connection:**
**Required Components:**
* DHT11 sensor module
* 3 jumper wires
**Wiring Diagram:**
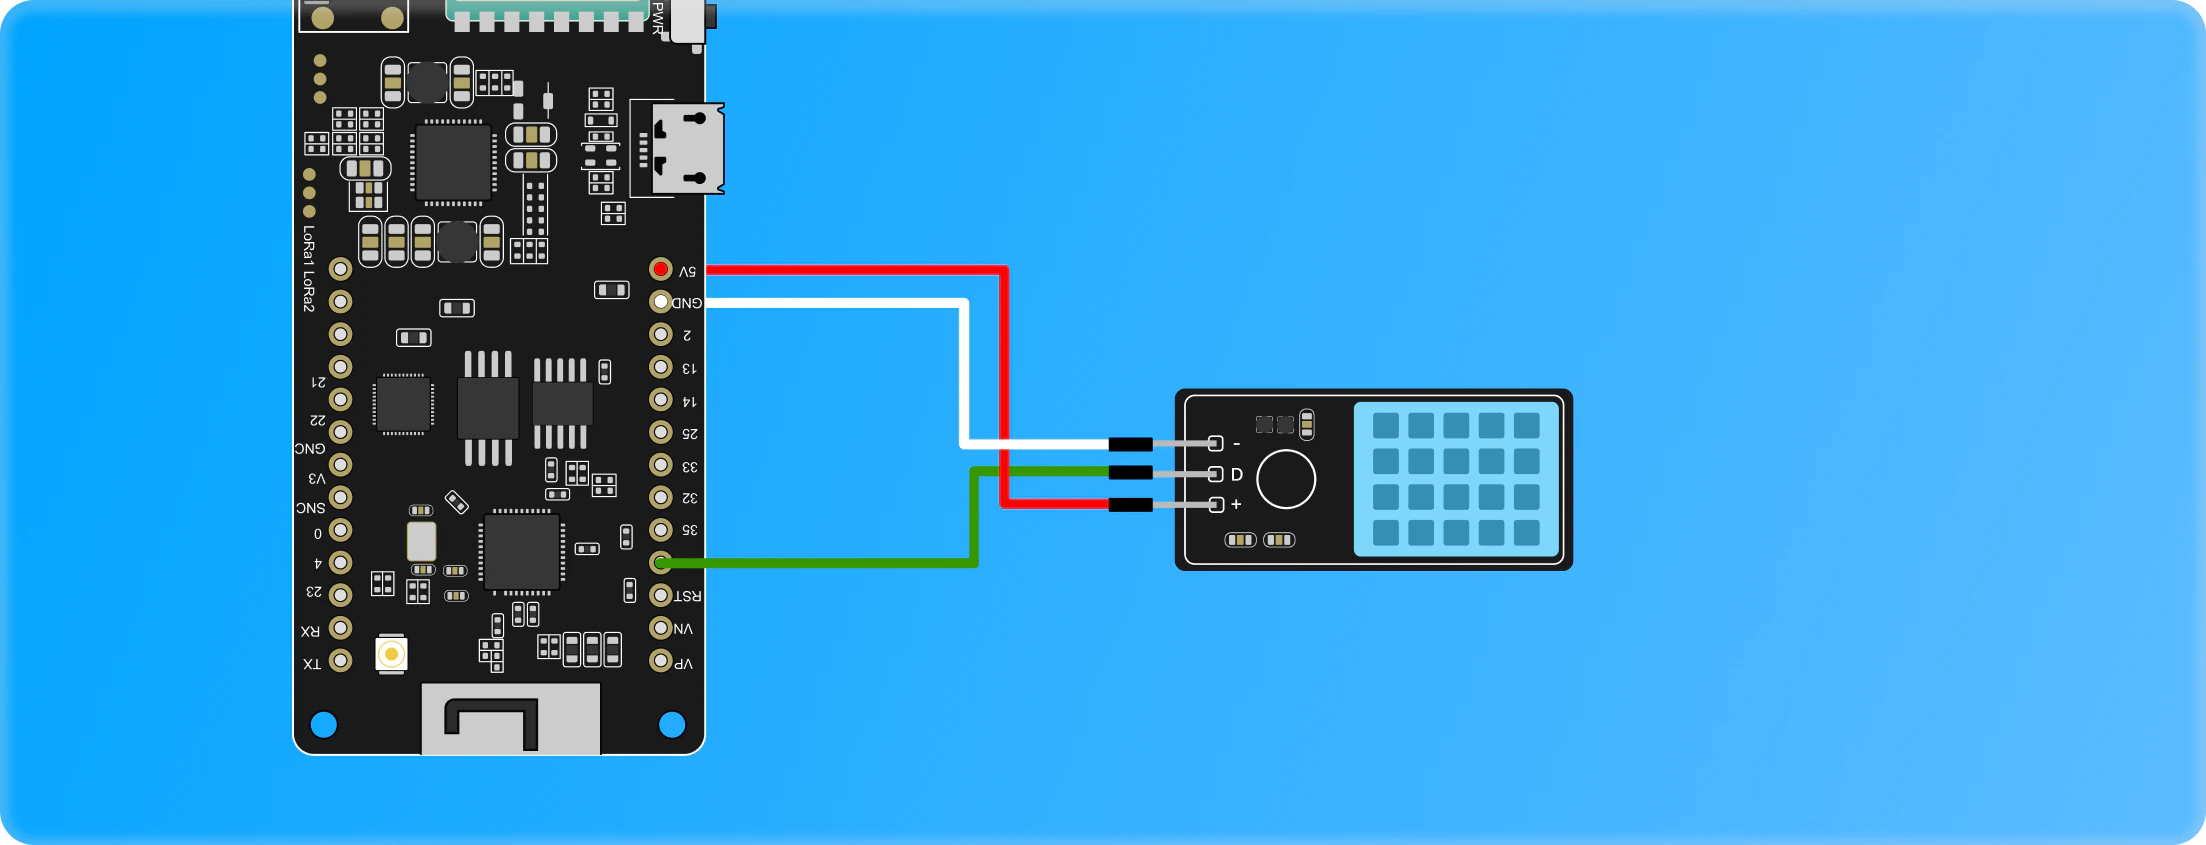 | DHT11 Pin | MamaDuck Pin | Description |
| --------- | ----------------- | ------------ |
| VCC | 5V (or 3.3V) | Power supply |
| GND | GND | Ground |
| DATA | GPIO 15 (default) | Data signal |
DHT11 sensors can work with both 3.3V and 5V. Check your module's specifications. Some modules have built-in pull-up resistors.
Make sure you choose an available GPIO pin on your device and enter the correct pin number in the firmware configuration when flashing.
**Sensor Specifications:**
| Specification | Range/Value |
| -------------------- | ------------------------- |
| Humidity Range | 20-90% RH |
| Humidity Accuracy | ±5% RH |
| Temperature Range | 0-50°C |
| Temperature Accuracy | ±2°C |
| Sampling Rate | Max 1Hz (once per second) |
**Description:**\
Controls external addressable LEDs (NeoPixel/WS2812B) to display rainbow patterns. Useful for visual indicators, device testing, and demonstrations.
**Features:**
* Rainbow pattern display
* Supports multiple LEDs in series
* Addressable RGB control
* Configurable LED count
**Configuration Options:**
| Setting | Options | Notes |
| -------------- | ----------------- | ----------------------------- |
| Number of LEDs | 1-60 | Total LEDs in your strip/ring |
| GPIO Pin | Configurable | Digital pin for LED data |
| Pattern | Rainbow (default) | Pattern display mode |
**Hardware Required**: You must physically connect WS2812B/NeoPixel LEDs to your MamaDuck device before using this firmware.
**Hardware Connection:**
**Required Components:**
* WS2812B LED strip or NeoPixel ring
* External power supply (for >8 LEDs)
* Jumper wires
**Basic Wiring (1-8 LEDs):**
| DHT11 Pin | MamaDuck Pin | Description |
| --------- | ----------------- | ------------ |
| VCC | 5V (or 3.3V) | Power supply |
| GND | GND | Ground |
| DATA | GPIO 15 (default) | Data signal |
DHT11 sensors can work with both 3.3V and 5V. Check your module's specifications. Some modules have built-in pull-up resistors.
Make sure you choose an available GPIO pin on your device and enter the correct pin number in the firmware configuration when flashing.
**Sensor Specifications:**
| Specification | Range/Value |
| -------------------- | ------------------------- |
| Humidity Range | 20-90% RH |
| Humidity Accuracy | ±5% RH |
| Temperature Range | 0-50°C |
| Temperature Accuracy | ±2°C |
| Sampling Rate | Max 1Hz (once per second) |
**Description:**\
Controls external addressable LEDs (NeoPixel/WS2812B) to display rainbow patterns. Useful for visual indicators, device testing, and demonstrations.
**Features:**
* Rainbow pattern display
* Supports multiple LEDs in series
* Addressable RGB control
* Configurable LED count
**Configuration Options:**
| Setting | Options | Notes |
| -------------- | ----------------- | ----------------------------- |
| Number of LEDs | 1-60 | Total LEDs in your strip/ring |
| GPIO Pin | Configurable | Digital pin for LED data |
| Pattern | Rainbow (default) | Pattern display mode |
**Hardware Required**: You must physically connect WS2812B/NeoPixel LEDs to your MamaDuck device before using this firmware.
**Hardware Connection:**
**Required Components:**
* WS2812B LED strip or NeoPixel ring
* External power supply (for >8 LEDs)
* Jumper wires
**Basic Wiring (1-8 LEDs):**
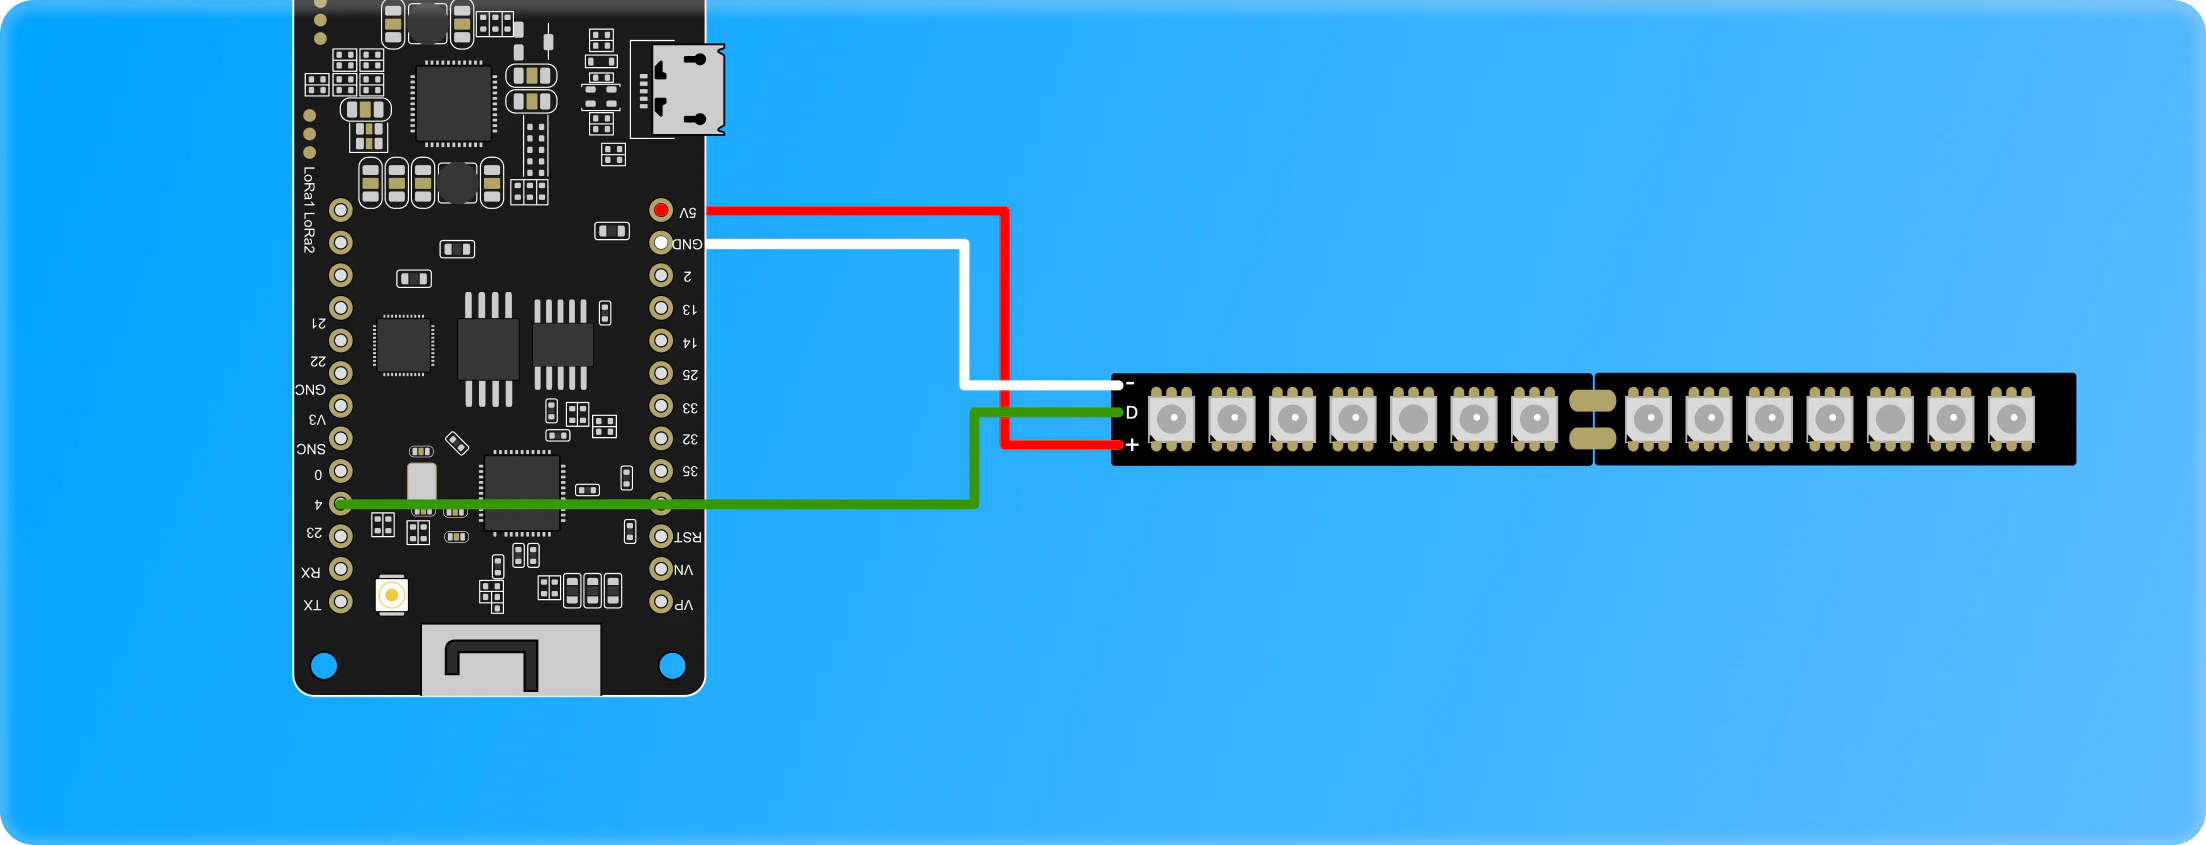 | LED Pin | MamaDuck Pin | Description |
| ------- | ---------------- | ------------ |
| VCC | 3.3V | Power supply |
| GND | GND | Ground |
| DIN | GPIO 4 (default) | Data input |
Make sure you choose an available GPIO pin on your device and enter the correct pin number in the firmware configuration when flashing.
**For More LEDs (>8):**
When using more than 8 LEDs, use an external 5V power supply. Connect the power supply ground to MamaDuck GND, but power the LEDs from the external supply's 5V output.
**Power Considerations:**
| LED Count | Current Draw | Power Source |
| --------- | ------------ | ---------------------- |
| 1-8 LEDs | \<400mA | USB power OK |
| 9-30 LEDs | 400mA-2A | External 5V required |
| 30+ LEDs | 2A+ | Dedicated power supply |
***
## Configuration Best Practices
* **Disable external LEDs**: Turn off when not needed for testing
* **Choose appropriate sensors**: BMP390 uses less power than DHT11 at high sampling rates
* **BMP sensors**: Allow 2-3 minutes warm-up time after power-on
* **DHT11**: Don't sample faster than once every 2 seconds
* **GPS**: Allow clear view of sky for best accuracy
* **All sensors**: Protect from direct sunlight and moisture
* **Verify voltage levels**: Most sensors use 3.3V, some tolerate 5V
* **Use quality jumper wires**: Poor connections cause intermittent failures
* **Secure connections**: Use hot glue or electrical tape to prevent disconnections
* **Test before deployment**: Verify sensor readings before field installation
* **Document GPIO pins**: Note which pins you used for future reference
***
## Troubleshooting
**Check:**
* Sensor is properly connected to correct GPIO pins
* Power and ground connections are secure
* GPIO pin number matches firmware configuration
* Sensor is compatible (voltage levels)
**Solution:**
* Verify wiring with multimeter
* Try different GPIO pins
* Check sensor with example code
**Common causes:**
* Sensor needs warm-up time
* Poor electrical connections
* Sensor damaged or counterfeit
* Sampling rate too high
**Solution:**
* Wait 2-3 minutes after power-on
* Replace jumper wires
* Source sensors from reputable suppliers
* Increase sensor interval
**Check:**
* Device has clear view of sky
* GPS antenna is connected
* Allow 1-2 minutes for initial fix
* Not indoors or under heavy foliage
**Solution:**
* Move to open area
* Check antenna connection
* Wait for initial satellite lock
**Check:**
* LED data pin connected to correct GPIO
* LEDs powered (5V for WS2812B)
* Ground shared between Duck and LEDs
* Number of LEDs matches configuration
**Solution:**
* Verify wiring connections
* Test LEDs with separate power supply
* Reduce number of LEDs if underpowered
***
## Next Steps
Ready to flash? Follow the flashing guide
Learn more about Duck device types
Manage your deployed devices
View sensor data in real-time
***
## Support
Need help with firmware or connecting sensors?
Ask the community for help
Contact our support team
| LED Pin | MamaDuck Pin | Description |
| ------- | ---------------- | ------------ |
| VCC | 3.3V | Power supply |
| GND | GND | Ground |
| DIN | GPIO 4 (default) | Data input |
Make sure you choose an available GPIO pin on your device and enter the correct pin number in the firmware configuration when flashing.
**For More LEDs (>8):**
When using more than 8 LEDs, use an external 5V power supply. Connect the power supply ground to MamaDuck GND, but power the LEDs from the external supply's 5V output.
**Power Considerations:**
| LED Count | Current Draw | Power Source |
| --------- | ------------ | ---------------------- |
| 1-8 LEDs | \<400mA | USB power OK |
| 9-30 LEDs | 400mA-2A | External 5V required |
| 30+ LEDs | 2A+ | Dedicated power supply |
***
## Configuration Best Practices
* **Disable external LEDs**: Turn off when not needed for testing
* **Choose appropriate sensors**: BMP390 uses less power than DHT11 at high sampling rates
* **BMP sensors**: Allow 2-3 minutes warm-up time after power-on
* **DHT11**: Don't sample faster than once every 2 seconds
* **GPS**: Allow clear view of sky for best accuracy
* **All sensors**: Protect from direct sunlight and moisture
* **Verify voltage levels**: Most sensors use 3.3V, some tolerate 5V
* **Use quality jumper wires**: Poor connections cause intermittent failures
* **Secure connections**: Use hot glue or electrical tape to prevent disconnections
* **Test before deployment**: Verify sensor readings before field installation
* **Document GPIO pins**: Note which pins you used for future reference
***
## Troubleshooting
**Check:**
* Sensor is properly connected to correct GPIO pins
* Power and ground connections are secure
* GPIO pin number matches firmware configuration
* Sensor is compatible (voltage levels)
**Solution:**
* Verify wiring with multimeter
* Try different GPIO pins
* Check sensor with example code
**Common causes:**
* Sensor needs warm-up time
* Poor electrical connections
* Sensor damaged or counterfeit
* Sampling rate too high
**Solution:**
* Wait 2-3 minutes after power-on
* Replace jumper wires
* Source sensors from reputable suppliers
* Increase sensor interval
**Check:**
* Device has clear view of sky
* GPS antenna is connected
* Allow 1-2 minutes for initial fix
* Not indoors or under heavy foliage
**Solution:**
* Move to open area
* Check antenna connection
* Wait for initial satellite lock
**Check:**
* LED data pin connected to correct GPIO
* LEDs powered (5V for WS2812B)
* Ground shared between Duck and LEDs
* Number of LEDs matches configuration
**Solution:**
* Verify wiring connections
* Test LEDs with separate power supply
* Reduce number of LEDs if underpowered
***
## Next Steps
Ready to flash? Follow the flashing guide
Learn more about Duck device types
Manage your deployed devices
View sensor data in real-time
***
## Support
Need help with firmware or connecting sensors?
Ask the community for help
Contact our support team